Friday, September 23, 2011

How to Create a Low Cost Media Room

The components are hidden which keeps the room clean
With the decrease in price points for quality surround sound systems, the ability to create a specific space for a theater-like experience has never been easier.  The construction aspect of the picture you see here was relatively inexpensive to do and I can just picture me and my family watching a movie or sports here..  Here are some steps you can do when planning for a media room and how we tackled this project:
  • Decide where the components are going to go We walked with the customer and identified the wall where the TV was going to go, and the space where the components were going to go.  Then, we put a flexible conduit in the wall cavity or ceiling leading from behind the TV to the place where the cable box. dvd, etc. is going to go.  If you are just starting this project, I highly recommend leaving additional pull strings in the event you want to add some wires or cables later.
  • Consider your light source If you have any windows or natural light, find a way to be able to cover it when need be.  This will make your picture viewing experience the best it can be, just like in the movies. 
  • Build a box platform  Because a step is usually 6 inches or so, we use 2X6's as a base framing, then top it with OSB plywood to make it nice and strong.  Screw it together if you don't want creaking.  Then, you can wrap it with carpeting to tie-in to the rest of the floor.  It's so heavy that once you set the platform down loosely, it's not going anywhere.
  • Theater seating Buy the best, most comfortable theater chairs you can afford and enjoy!  Make sure when you set up the distance of the chairs, you look to viewing instructions for ideal distance from the screen.
The best part is, you won't have to pay $100 to take your family to the movies and it will be the gift that keeps on giving.  Enjoy your new theater and happy viewing.

Wednesday, September 7, 2011

How to Create and Open Kitchen and Save Space

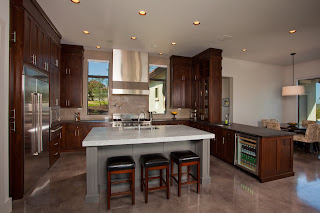
I used to get nervous telling people that they didn't necessarily "need" a formal dining room- but not anymore.  The more people we meet with, the more I'm convinced that there is an evolution of less formal, and more open eating spaces going on.  Take this picture as an example.  This homeowner wanted a space where they could cook and visit with the kids and or guests while doing so.  If you look off to the right you can see that the breakfast table is fairly sizeable and can seat quite a few folks as well.  Quick disclaimer, I have a formal dining room and love it, as I'm sure do a lot of you.  This economy has forced us though to think more creatively and repurpose spaces so that you don't have a room that's collecting dust while you live in it.  We are doing more banquettes now, large islands with multiple seating, informal breakfast areas, and breakfast areas on "steroids".  What I mean by that is an oversized breakfast area, with built-ins or niche and plenty of seating for 8 people.  One other cool thing about this picture is if you notice the backsplash is done in venetian plaster- not tile.  Really cool treatment that you could also consider doing yourself. 

Thursday, August 25, 2011

How to Design a Cool Ceiling

One area that often gets overlooked is the ceiling.  Sometimes called the "5th wall", you would be surprised what an impact can be made with a little thought.  The ceiling in this picture is one we did that has a sheetrock furr down around it, creating a tray ceiling.  We then added 2 X 4's at the bottom most part of the tray both horizontally and vertically to create a cove to hold rope lights.  This particular tray received a plaster treatment, but you could go a lot less expensive by doing something with a paint.  There are all kinds of cool paints now available at your local hardware store.  We sheetrocked over the cove area, then we triple ran rope light so that you would notice it at anytime during the day.  This is key, because so often people only run one strand of light, and it is lost on the effect that you are trying to pull because you can only see it at night.  The rope lights are switch activated, so they can be turned on and off at your discretion.  This effect can be done on all scales of budget, so if you are considering doing something to your ceiling- this is a fantastic option for the price.